Tutorials
Map
Resources used:
- W3schools' css image sprites tutorial
- The Spriters Resource, for graphics taken straight from games
- Aseprite (paid, also on Steam, Itch.io, and Humble Bundle)
- Pixilart (free, in browser, alternative to Aseprite)
- spritegen's sprite sheet generator
- Layoutit! (for making a css grid)
Words you might not recognize:
- Tileset - a collection of square images (tiles) used in games for making maps
- Sprite - An image used in games, typically for characters or items that move. Also used as a catch-all term for pixel graphics used in games.
- Spritesheet - A collection of sprites in one image. Kinda like a tileset but for sprites!
Let's Get Started!
First, we're going to need graphics. You can make your own with Aseprite or Pixilart (or any other art program. Graphics do not have to be pixel art, but pixela rt is the focus of this tutorial). You can also spend some time browsing my favorite website, Spriter's Resource, to see if the tileset from your favorite game is available!
Bonus tip! When searching on Spriter's Resource, make sure you're searching by games! Searching by assets can give an overwhelming number of results.
For this tutorial, I'll be using the Dragon Quest I & II for the Gameboy Color's tiles for multiple reasons, but it's a favorite game of mine and I was the one who ripped the tiles and uploaded them.
Anyway! You need graphics. You'll need a tileset for the background and a spritesheet with buildings, landmarks, furniture, or characters, depending on what kind of look you want for your map. The sprites from the spritesheet will be your links, so you probably don't need a lot of them.
Some of the spritesheets have a background color. We don't want that, we want our sprites to have a transparent background. This should be easy enough to do, just erase the background pixels. For the sake of the tutorial, I will assume you know how to do that.
Now, to make a custom spritesheet with just the sprites we plan on using, we can eitehr arrange them in Aseprite/Pixilart or we can make them into individual images and upload them to Spritegen's Spritesheet Maker. The Spritesheet Maker should make the most size-effective sprite sheet it can.
Spritegen also has an option to get the CSS already prepped for you! If you want, you can go ahead and save that CSS somewhere you can find it later!
Here's my sprite sheet! I left the background in and am only using 3 sprites. I decided to pick diffferent size sprites for variety
Now, decide how big of a map you want. I suggest going small-ish. It's easier to work with and you're less likely to end up with big empty spaces. I'll be making a 5x3 tile map with 16px tiles. That makes the map size 80px by 48px. that's really small, so we'll be resizing our tiles and sprites to be 48px rather than 16px (3 times bigger) when we put them on our site.
Here's what I came up with for the map (before resizing). It's nice and small, which will work great.

You should now have your sprite sheet and your map background. Upload your sprites to your website as normal and make sure you remember where on your site you save them.
Now for the fun stuff!
Code Time!
For this tutorial I will not be using Spritegen, just so I can explain the process of not having the CSS prepared for you.
First Up: HTML
The HTML is pretty simple.
Done!
Stylin' Time
This is where things get a lil complicated! You have to do some math with the map and sprite sizes now. We need to find the width of our map, in my case that would be 16 (the tile size) x 5 (number of tiles). That is 80! Now we multiply 80 x 3 to get the 48px tiles I mentioned earlier. That gets us a total of 240px width!
We'll quick add a lil snippet of CSS to make sure our pixel art doesn't get blurry when resized.
Alright, time for grids! I'll be using a grid generator for ease's sake! Specifically, I like to use Layoutit!. In Layoutit, add or remove columns and rows until you have your map size. For me, my map was 5x3 tiles, so I'll have 5 columns and 3 rows.
Now, pick where you want your first sprite and add it to Layoutit! Layoutit gives you the HTML and CSS, making things super easy!
Alternatively, you can use the CSS below. I changed a few things after copy-pasting from Layoutit, namely the "1fr"s and the classes
I don't know exactly how to explain what everything here means, I've learned CSS grids mainly by messing around with them. I'll pass you off to this W3schools article for CSS grids in general and this W3schools article on grid-template-areas. Those will explain 100 times better than I would, haha.
Now, for the sprite's CSS! It's very simple!
Now, we add our tileset and spritesheet images! This requires the tiniest amount of math.
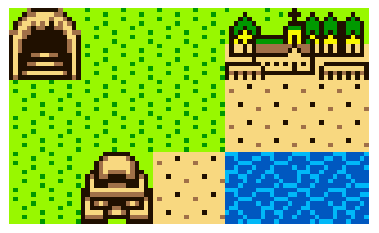
And that should be it! My finished map looks like this:
I do recommend styling the sprite's to do something, anything, on hover so visitors know what to click on. To do that, just add .map a:hover to your style sheet and style it however you want.
If you have any questions or comments you can send them to my guestbook or email me at ansehelm.onlywonder@gmail.com